Swappable Max Logic Using bpatchers
A question that comes up occasionally is the viability of switchable Max logic: Is it possible to ‘swap out’ portions of a patch, similar to the way a plug-in can be swapped into a DAW channel? There are a few ways to do this, but one useful way is to take advantage of bpatchers and their ability to change the patcher embedded within the object.
Switching Event Logic
Let’s begin with an example:
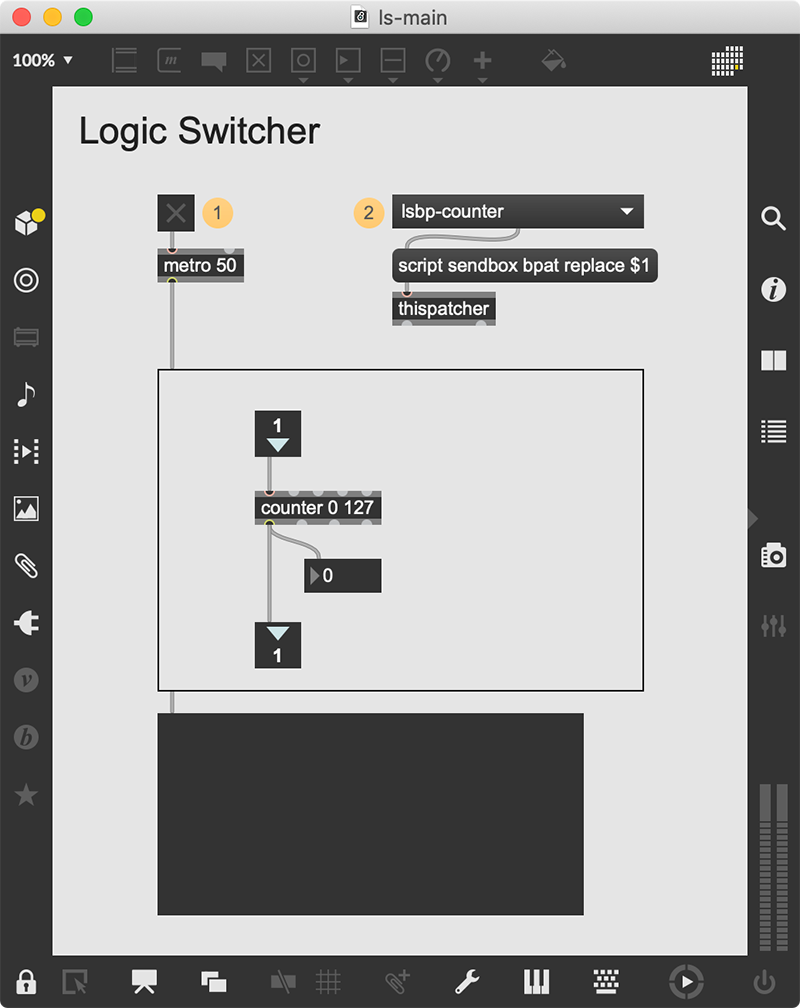
Start the metro at the top of the patch to see the output of the bpatcher in the multislider. It creates a counter-based ramp from 0 to 127, just as you’d expect. Now, select "lsbp-random" from the umenu object and you’ll see that the contents of the bpatcher changes, with the output now tracking the random object output.
How it works
This trick is based on the magic of the thispatcher object. thispatcher is used to control the function of any patcher that contains it; it is the basis for scripting, which allows us to manipulate objects and connections within the patch.
Why do we need to use thispatcher and scripting? It’s because of how inlets to bpatchers work: a message sent into the inlet of a bpatcher is routed to the embedded patch, and is not used by the bpatcher itself. So we cannot simply send messages to the bpatcher; we have to have the Max scripting engine communicate for us.
Scripting is a complicated branch of Max programming, but we only have to scratch the surface of scripting to get our example to work properly. In this case, we use the script sendbox message to thispatcher, with the scripting name of the bpatcher (in this case, “bpat”), and a command to send to the bpatcher (“replace”). Finally, we provide the new patcher file name and trigger the message. This allows you to have different logic in each patcher file, giving us the ability to create swap-in content for any performance patch.
Making bpatcher files that work properly
There are a couple of rules that you will have to follow in order for this to work correctly. First of all, all of the bpatchers should have the same number of inlets and outlets. If you load a bpatcher file that has fewer inlets or outlets than your patch expects, the patch generates an error and disconnects patch cords from unavailable connections. You can see that all of the patches in our example have the same number of inlets and outlets.
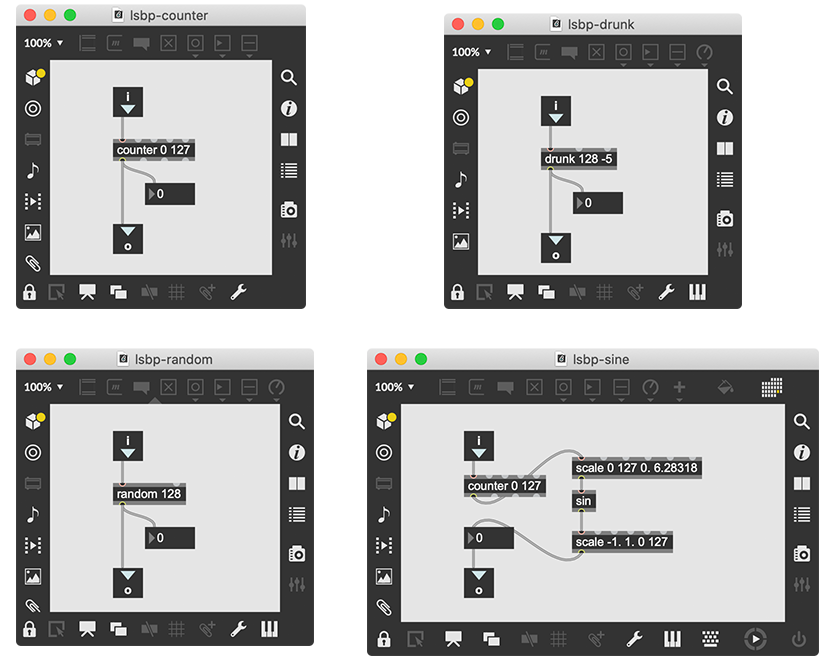
Also, you will want to make sure that all of the bpatcher files are in the Max search path, or in the folder with the patcher that is using it. The file names also have to be unique within the search path. If you name one of your files “sinewave”, then create another patch called “sinewave” in the future, you cannot be sure that the proper file will always be loaded. So it is a good idea to create very unique patch names for your replacement patches – in our example, I used “lsbp-“ as a prefix to the filename to keep things unique.
Switching Audio Logic
An obvious question follows: Can this technique be used for audio, too? Let’s give it a try:
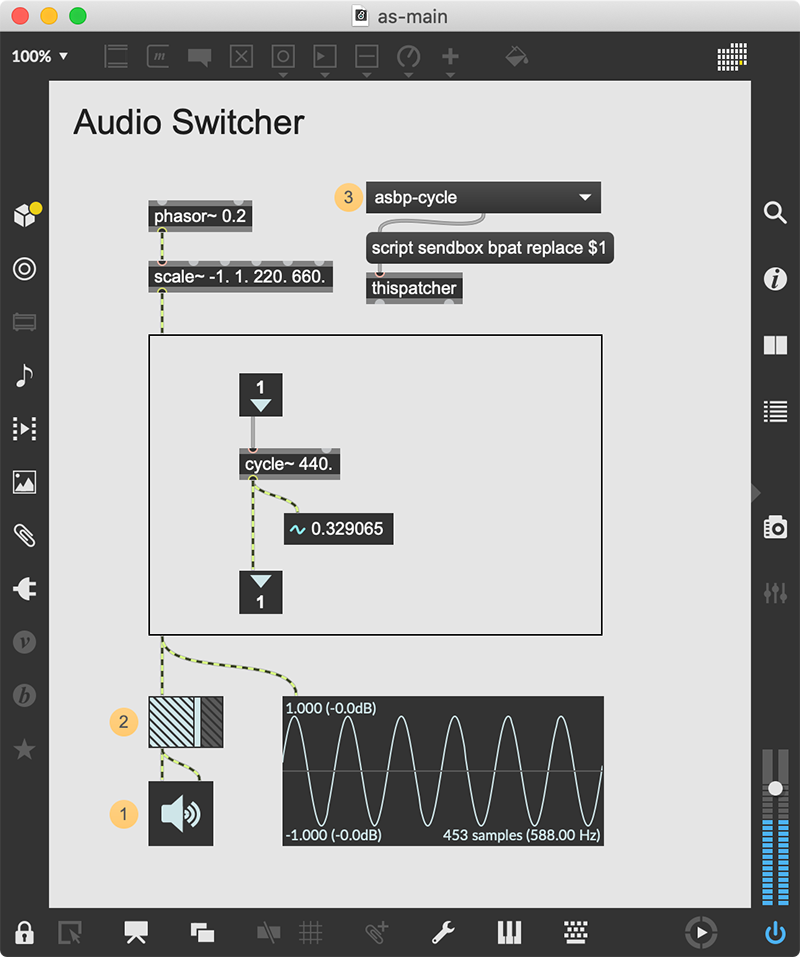
Start the system by turning on the ezdac~ and turning up the gain~ setting. You’ll hear a cosine wave ramping from 220 to 660 Hz. Now select a different patch from the menu, and you’ll hear the audio change along with the contents of the bpatcher.
In fact, there is really no difference in working with events or with audio. You need to maintain the inlet and outlet count, and the bpatcher files need to have unique names.
The asbp-pinknoise patch file does show something we didn’t see earlier: in this case, in order to maintain connections, we had to have an inlet that isn’t connected to anything!
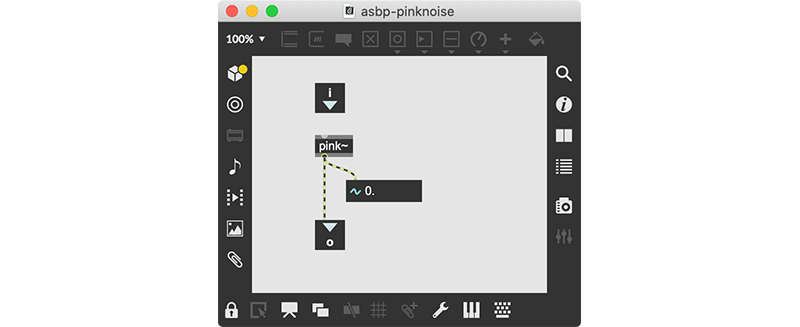
This is a ‘dummy’ inlet that is only there to maintain the inlet on the bpatcher object, and to prevent any errors when replacing files.
Discontinuity?
Let's take a look at another example, where we embed more sophisticated logic into replaceable bpatcher files:
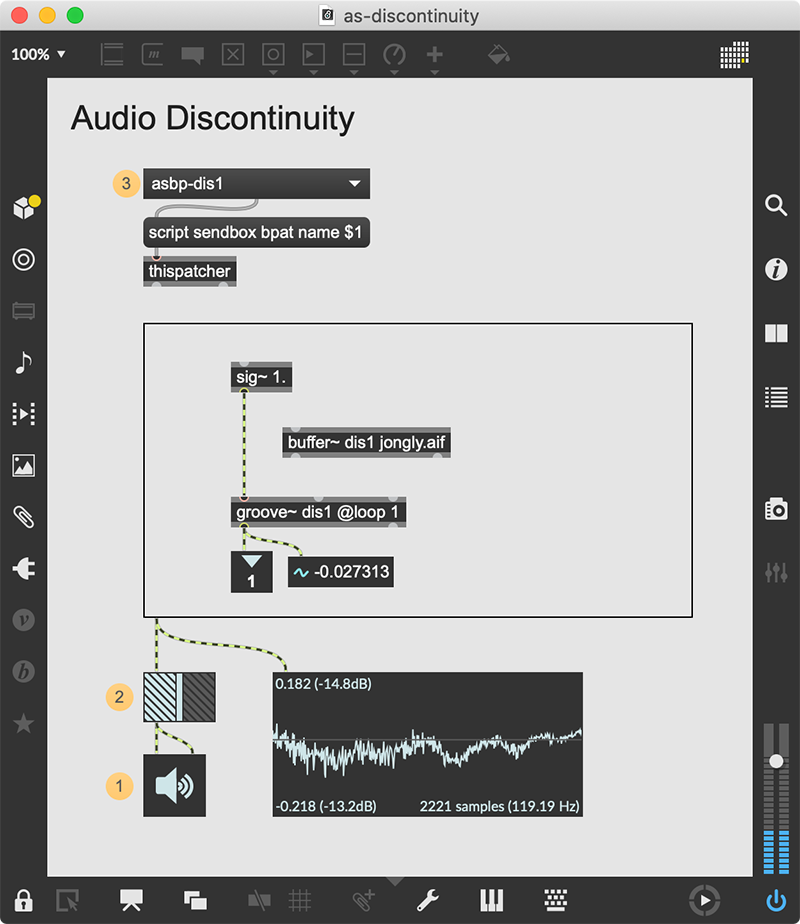
In this case, each of the bpatcher files has to load a file into a buffer~, and the asbp-dis2 file contains additional DSP for filtering. Since this logic can take some time to initialize, you might be concerned that there would be audio ‘glitches’ when you are switching files. However, even in this case (with file loads occurring), no glitch. Why not?
The crossfade preferences
The answer is found in Max’s preferences, under the ‘Mixer’ category.

The option to “Enable Mixer Crossfade” determines what happens when you make a change to the DSP chain of your patch. If this is set to “Off” (the default), your patch will quickly fade out, rebuild the DSP chain, then fade back in again. The speed of the fade is controlled by the “Mixer Crossfade Ramp Time” setting.
However, if you set “Enable Mixer Crossfade” to “On”, a little bit of magic happens. When you make a change to the DSP chain of the patch, audio is buffered for the duration of the “Mixer Crossfade Latency” setting. Then the new version of the patch is built, the DSP chain is built, then the system crossfades from the buffered audio into the patch's audio output. The crossfade time is controlled by the “Mixer Crossfade Ramp Time”, which (as you might guess) must be set lower than the “Mixer Crossfade Latency”.

If you plan on doing crossfade in a performance situation, tweaking these settings is critical to get snappy-feeling user interface while preventing audible glitches. But note: since you are working with buffered audio, high-CPU patches (for example, >50% CPU usage) may still glitch, since your system will not be able to rebuild the DSP chain before the buffer runs dry.
Using the bpatcher swap trick is a great way to build "plug-in" logic modules for your patches. Just follow the simple patch creation rules, and make your performance patches more easily extensible without having to edit the base patch. And remember, with bpatchers, you can also take advantage of presentation mode for unique UI’s for each embedded patch as well. This is a powerful tool for Max patch development, all thanks to the magical thispatcher object!
by Darwin Grosse on September 30, 2021

